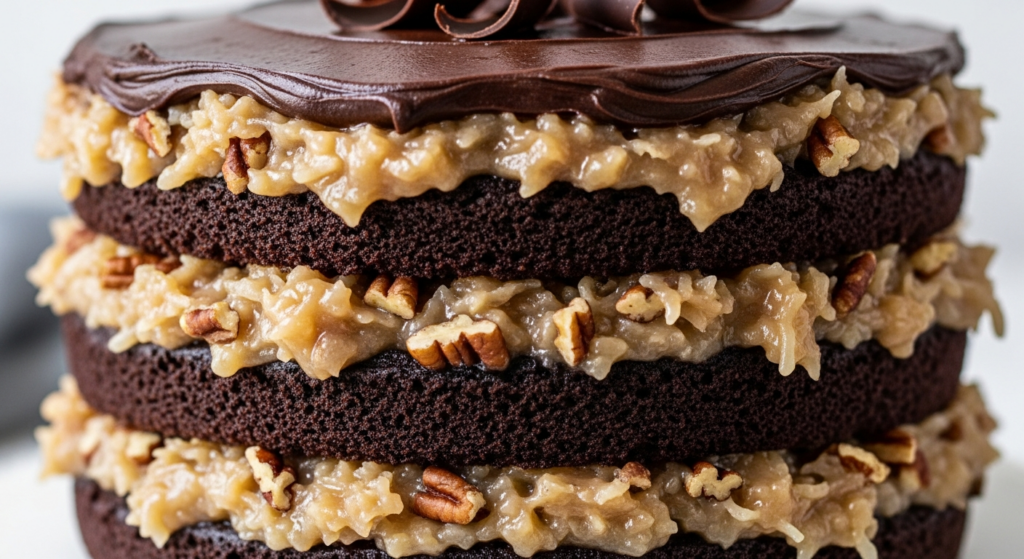
German chocolate cake recipe stands as a party of rich flavors and nostalgic charm-a dessert gifted by history yet perfected by every passionate baker who embraces its luscious layers. Rooted in an intriguing story dating back to the 1950s, this cake encapsulates the essence of moist, tender chocolate sponge paired with a uniquely decadent coconut pecan frosting. My first encounter with this cake was at a family gathering where each forkful revealed a balance of texture and sweetness that inspired my pursuit to master it perfectly in my own kitchen.
Prep and Cook Time
- Planning: 30 minutes
- Baking Time: 25-30 minutes per layer
- Cooling: 40 minutes
- Total time: Approximately 2 hours
Yield
Serves 12 generous slices-perfect for sharing celebrations or savoring with afternoon coffee.
Difficulty Level
Medium: While the layering and frosting require attention and patience, step-by-step guidance ensures delightful success.
Ingredients
- For the cake layers:
- 1 ½ cups all-purpose flour, sifted
- 1 cup granulated sugar
- 1/4 cup cocoa powder, unsweetened
- 1 tsp baking soda
- 1/2 tsp salt
- 1 cup buttermilk, room temperature
- 1/2 cup vegetable oil
- 2 large eggs, room temperature
- 1 tsp vanilla extract
- 1 cup hot water
- For the coconut pecan frosting:
- 1 cup evaporated milk
- 1 cup granulated sugar
- 3 large egg yolks, beaten
- 1/2 cup unsalted butter
- 1 1/2 cups sweetened shredded coconut
- 1 cup chopped pecans
- 1 tsp vanilla extract
Instructions
- Preheat your oven to 350°F (175°C). Grease and flour two 9-inch round cake pans – for even layers, line the bottoms with parchment paper.
- In a large bowl, sift together flour, sugar, cocoa powder, baking soda, and salt.
- In a separate bowl, whisk buttermilk, vegetable oil, eggs, and vanilla extract until smooth.
- Slowly combine the wet ingredients into the dry mixture, stirring gently.
- Carefully add the hot water and mix until the batter is thin and homogenous. The thin batter ensures a moist, fluffy texture after baking.
- Divide the batter evenly between prepared pans. Bake for 25-30 minutes or until a toothpick inserted in the center comes out clean.
- Remove cakes from oven and allow to cool in pans for 15 minutes before transferring to wire racks to cool entirely.
- Simultaneously occurring, prepare the frosting: In a medium saucepan, combine evaporated milk, sugar, beaten egg yolks, and butter.
- cook over medium heat, stirring constantly, until thickened and golden brown, about 10-12 minutes.
- remove from heat and stir in shredded coconut, chopped pecans, and vanilla extract. Allow frosting to cool until spreadable,about 20 minutes.
- assemble the cake: Place one cake layer on your serving plate, evenly spread half of the coconut pecan frosting over it.
- Top with the second layer and generously spread the remaining frosting on the top and sides. For a beautiful finish, let some frosting drip slightly over edges.
Tips for Success
- Measure ingredients precisely: Use a kitchen scale for flour and sugar to ensure consistent texture.
- Room temperature ingredients: Bringing eggs and buttermilk to room temp helps your batter blend smoothly and achieve fluffiness.
- Hot water addition: This technique intensifies chocolate flavor while keeping layers tender.
- Cooling is key: Frost only when cakes are completely cool to prevent melting or sliding layers.
- Make frosting ahead: Prepare up to 1 day in advance; store chilled and gently rewarm before spreading.
Serving Suggestions
Present your masterpiece with a few toasted pecans sprinkled on top for added texture and a glossy chocolate drizzle to accentuate contrast. Pair slices with a scoop of vanilla bean ice cream or a robust cup of freshly brewed coffee to balance the richness.
| Nutrient | Per Serving (1 slice) |
|---|---|
| Calories | 420 kcal |
| protein | 5 g |
| Carbohydrates | 53 g |
| Fat | 20 g |
Explore more chocolate cake recipes to diversify your dessert repertoire.For a detailed history of the cake’s origins, check out the History Channel’s article on german Chocolate Cake.

Q&A
Q&A: The Ultimate Guide to the Best German Chocolate Cake Recipe
Q1: What makes German Chocolate Cake diffrent from regular chocolate cake?
A1: Unlike your typical rich, fudgy chocolate cake, German Chocolate Cake is a delightful balance of layers: a moist chocolate sponge paired with a luscious, coconut-pecan frosting. Its signature filling is sweet,nutty,and a little gooey-thanks to the caramelized coconut and pecans-that sets it apart from the usual chocolate varieties.
Q2: Why is it called “German” Chocolate Cake if it’s American?
A2: Great question! The “German” in German Chocolate Cake actually refers to Samuel German, who developed a special type of sweet baking chocolate in the 1850s. The recipe that uses his chocolate became popular in the U.S. during the mid-20th century, hence the name. So, it’s German by chocolate, not by origin!
Q3: What type of chocolate is best for authentic German Chocolate Cake?
A3: For an authentic cake, use sweet baking chocolate known as German’s Sweet Chocolate. If you can’t find it,semi-sweet or bittersweet chocolate can work as substitutes,but the sweetness and flavor intensity will vary. The key is to balance the deep chocolate notes with the creamy, coconutty frosting.
Q4: Can I make the coconut-pecan frosting ahead of time?
A4: Absolutely! The frosting actually tastes better after it’s had some time for the flavors to meld. You can make it a day ahead and store it in the fridge.Just bring it back to room temperature and give it a gentle stir before spreading it on the cake layers.Q5: Are there any tips to keep the cake moist and fluffy?
A5: Yes! Use buttermilk or sour cream in your batter to add moisture, and don’t overmix the batter to keep it tender. Also, be mindful of your baking time-check for doneness with a toothpick just before the recipe’s suggested time to prevent overbaking.
Q6: How can I customize the classic German Chocolate Cake recipe?
A6: Creativity shines here! Try swapping pecans for walnuts, adding a splash of bourbon or rum to the frosting for an adult twist, or layering in fresh blackberries for a burst of tartness. You can also experiment with frosting flavors-like adding a hint of espresso to enhance the chocolate depth.
Q7: What’s the best way to serve German Chocolate Cake?
A7: Serve it slightly chilled or at room temperature with a scoop of vanilla ice cream or a dollop of whipped cream. It pairs perfectly with a rich coffee or a smooth dessert wine, making it a show-stopping finale to any meal.
Q8: How should I store leftover German Chocolate Cake?
A8: As of the moist coconut-pecan frosting, it’s best to keep leftovers covered tightly in the fridge.It should stay fresh for up to 4 days. Before serving, let the cake sit out for about 30 minutes to take the chill off, so every bite is as decadent as the first.
Whether you’re a baking novice or a dessert aficionado, mastering the best German Chocolate Cake recipe is a delicious achievement-one that fills your kitchen with irresistible aromas and your heart with sweet satisfaction!
The Conclusion
With every rich bite of this ultimate German chocolate cake, you’re not just savoring a dessert-you’re indulging in a piece of culinary history crafted with love and tradition.Now that you have the perfect recipe and all the insider tips, it’s time to bring that decadent, coconut-pecan frosting to life and watch as it transforms your kitchen into a slice of German dessert heaven. Whether you’re celebrating a special occasion or simply craving a sweet escape, this cake promises to deliver joy with every forkful. So go ahead-bake boldly, share generously, and let the luscious layers of chocolate delight become a new favorite in your dessert repertoire. happy baking!
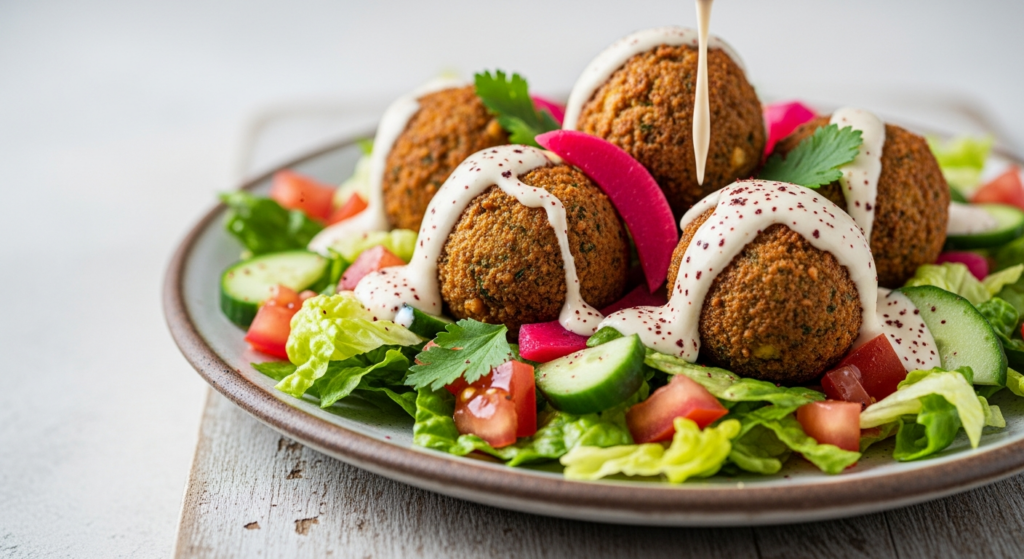
Crispy & Flavorful: Mastering Homemade Falafel Recipes
When it comes to making the perfect falafel, starting with premium chickpeas sets the foundation for creating crispy, golden bites bursting with deep, complex flavors. originating from Middle Eastern street food traditions, falafel is a dish that combines humble ingredients with bold seasoning and precise technique, resulting in a culinary experience that is both satisfying and versatile. Coming from years of experimenting in my kitchen, I’ve come to understand the magic behind every crispy falafel-starting from selecting the right chickpeas to achieving that irresistible crunch that leaves you craving more.
Prep and Cook Time
- Planning: 20 minutes (plus soaking time)
- cook Time: 15 minutes
- Total Time: 8 hours 35 minutes (including chickpeas soaking)
Yield
Makes approximately 24 falafel balls, serving 4 generously.
Difficulty level
Medium: Requires some preparation time and frying technique, but approachable for home cooks with basic kitchen skills.
Ingredients
- 1 ½ cups dried chickpeas, soaked overnight and drained
- 1 small onion, roughly chopped
- 4 cloves garlic, minced
- 1 cup fresh parsley leaves, packed
- ½ cup fresh cilantro leaves, packed
- 1 tsp ground cumin
- 1 tsp ground coriander
- ½ tsp cayenne pepper (adjust to taste)
- 1 tsp kosher salt
- ½ tsp baking powder
- 3 tbsp all-purpose flour (for binding)
- Vegetable oil for frying (about 3 cups)
Instructions
- Prepare the chickpeas: after soaking your dried chickpeas overnight, drain them thoroughly. Avoid canned chickpeas, as they are too soft to yield crispy falafel.
- Pulse the mixture: In a food processor, combine chickpeas, onion, garlic, parsley, and cilantro. Pulse in short bursts until the mixture resembles coarse breadcrumbs with some small pea-sized bits remaining-which helps create texture.
- spice it up: Transfer the mixture to a bowl and mix in cumin, coriander, cayenne pepper, salt, baking powder, and flour. Refrigerate for at least 30 minutes. This chilling firm ups the mixture, making it easier to form into balls.
- Form your falafel: Using your hands or a falafel scoop, shape the mixture into firm balls or slightly flattened patties, about 1 ½ inches in diameter.
- Heat your oil: In a deep pan or pot, heat vegetable oil to 350°F (175°C). Using a thermometer ensures the oil stays at the perfect temperature for frying without absorbing excess oil.
- Fry until golden: Fry falafel in batches, not overcrowding the pan. Cook 3-4 minutes per batch, turning occasionally to ensure an even, crispy exterior.
- Drain and serve: Use a slotted spoon to transfer falafel to a paper-towel-lined plate. This helps absorb any remaining oil, keeping your falafel nicely crisp.
Tips for Success
- Choosing the perfect chickpeas: Always opt for dried chickpeas soaked overnight. This prevents mushiness, which compromises the falafel’s crunch.
- Flavor layering: Fresh herbs transform the spice blend, providing a vibrant green colour and fresh bite. Feel free to experiment with adding mint or dill for personalized twists.
- Binding without egg: traditional falafel skips eggs; baking powder and flour are your trusty binding agents.
- Achieving ultimate crispiness: Maintain oil temperature consistently; if too low, falafel absorbs oil and gets greasy; if too hot, they burn on the outside but remain raw inside.
- Make-ahead pleasant: The mixture can be refrigerated for up to 24 hours pre-frying or frozen in shaped balls for easy cooking later.
Creative Serving Ideas to Elevate Your Falafel Experience
Once your falafel come out perfectly crispy and bursting with flavor, elevate the dish with thoughtful accompaniments to showcase its versatility.
- Classic pita pockets: Stuff warm pita breads with falafel, fresh tomato slices, cucumber ribbons, and a dollop of creamy tzatziki or tahini sauce.
- Falafel bowls: Create a nourishing grain bowl with quinoa or fluffy couscous, roasted vegetables, pickled red onions, and a drizzle of lemony herb dressing.
- Salad topper: Scatter falafel over vibrant green salads with chopped kale, radishes, and toasted pine nuts for texture contrast.
- Flatbread tapas: Serve mini falafel balls with a variety of dips like baba ganoush,harissa yogurt,and chopped herbs sprinkled on top.
- Garnishing flair: Fresh herbs such as parsley and cilantro add a pop of color; finishing with pomegranate arils adds a jewel-like burst of sweetness and contrast.
| Nutrient | Per Serving (6 falafel balls) |
|---|---|
| Calories | 310 kcal |
| Protein | 12 g |
| Carbohydrates | 38 g |
| Fat | 10 g |

For further inspiration on middle Eastern flavors, check out our detailed guide on Middle Eastern spice blends. To deepen your knowledge on chickpeas’ nutritional benefits and preparation, this Healthline article is an excellent resource.
Q&A
Q&A: Crispy & flavorful – Ultimate Guide to Homemade Falafel Recipes
Q1: what makes homemade falafel different from store-bought versions?
A1: Homemade falafel bursts with freshness and customizable flavors that store-bought versions often lack. When you make falafel at home, you control every ingredient-from the spices to the texture-resulting in irresistibly crispy, golden patties packed with vibrant, authentic taste.
Q2: What’s the secret to achieving that perfect, crispy exterior?
A2: The magic lies in the chickpeas! Use dried chickpeas soaked overnight rather than canned ones, as they hold together better and fry up crispier. Also, avoid over-blending the mixture for a perfect crumbly texture. frying in hot oil (about 350°F/175°C) instantly after shaping helps lock in that crunch without absorbing excess oil.
Q3: can I bake falafel instead of frying?
A3: Absolutely! Baking is a lighter,less greasy option. To keep them crispy, brush the falafel lightly with olive oil and bake at a high temperature (around 400°F/200°C). You may want to flip them halfway through cooking for even browning. While not quite as crispy as frying, baked falafel still deliver robust flavor and a satisfying texture.
Q4: Which herbs and spices best elevate falafel’s flavor profile?
A4: fresh herbs like parsley and cilantro are staples-brightening and balancing the earthiness of chickpeas. For spices, cumin, coriander, and a touch of garlic powder create that warm, aromatic core. Don’t shy away from a pinch of cayenne or smoked paprika for subtle heat and depth.
Q5: Is it essential to use chickpeas, or are there alternatives?
A5: Chickpeas are classic, but you can experiment with fava beans, lentils, or a mix of legumes for a unique twist.Each offers different textures and flavors,so try what suits your palate or dietary needs. Remember, textures vary-adjust your binders and cooking method accordingly.
Q6: How do I keep falafel moist on the inside and crunchy outside?
A6: Balance is key! Soak your chickpeas just right-fully hydrated but not mushy. Mix in moisture-rich ingredients like finely chopped onions and fresh herbs. Avoid adding too much water or flour; rather, use a small pinch of baking soda or flour to bind without weighing down the mixture.Fry on medium-high heat for a perfect crispy shell that locks in tender insides.
Q7: What are some creative serving suggestions for homemade falafel?
A7: The world’s your falafel oyster! Classic pita pockets with tahini sauce, fresh veggies, and pickles are always winners. Try falafel grain bowls with quinoa, roasted veggies, and a zingy yogurt drizzle. You can also get adventurous-falafel tacos,wraps,or even falafel sliders with tangy sauces make incredible bites bursting with flavor.
Q8: Can falafel be made ahead or frozen?
A8: Yes! You can shape the falafel balls or patties and freeze them raw on a tray, then transfer to a bag. When ready, fry straight from frozen-adding a minute or two to your cooking time. Cooked falafel also freeze well; just reheat in the oven to revive that crispy texture.
Q9: What common mistakes should I avoid when making falafel?
A9: Avoid using canned chickpeas-they’re too soft and often result in mushy falafel. Don’t over-process the mixture; you want some texture.Also, be sure your oil is hot enough before frying-too cold and falafel will absorb oil and become greasy, too hot and they’ll burn outside while staying raw inside. Lastly, don’t overcrowd the pan to maintain even heat distribution.
Q10: How can I customize falafel to fit different dietary preferences?
A10: Falafel is naturally vegan and gluten-free if you skip or substitute flour. For gluten-free options, use chickpea flour or oat flour as binders. If you want to add extra protein, try mixing in finely chopped nuts or seeds. Play with spices and herbs to tweak flavor intensity. This humble legume patty is a fantastic blank canvas for all tastes!
key Takeaways
Whether you’re a seasoned falafel fanatic or a curious kitchen adventurer, mastering the art of crispy, flavorful falafel is a rewarding journey that brings the vibrant spirit of Middle Eastern cuisine right to your table. With the tips and recipes shared in this ultimate guide, you’re now equipped to create golden, crunchy pockets of herb-infused bliss that rival any restaurant favorite. so grab your blender, dust off that skillet, and let your homemade falafel become the star of gatherings, snacks, and meals alike-each bite a festivity of culture, crunch, and undeniable flavor. Happy cooking!
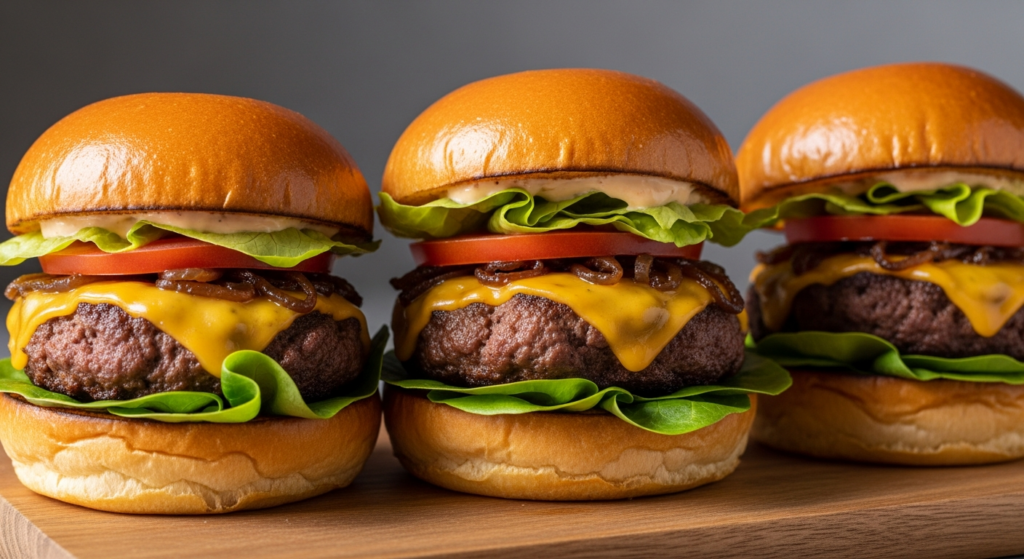
Weather you’re hosting a casual get-together, hunting for crowd-pleasing appetizers, or simply craving an indulgent snack, beef sliders deliver endless delight with every mouthwatering bite. in this ultimate guide, we’ll dive into the art and fun of crafting these miniature marvels-exploring everything from savory seasoning secrets to inventive toppings and presentation tips-so you can turn your kitchen into a slider sanctuary where flavor knows no bounds.
Get ready to embark on a tasty journey that celebrates the joy of beef sliders in all thier glorious, hand-held glory!
Bite-Sized Bliss: Choosing the Perfect Beef Blend for Juicy Sliders
Bite-sized bliss starts with the perfect beef blend – a magical mix that ensures every slider bursts with juicy, savory flavor. Whether you’re a casual grill master or a slider aficionado, understanding your beef options elevates this classic handheld delight into pure culinary art. As someone who’s styled countless sliders for photo shoots and home gatherings, I’ve learned that selecting the right beef and mastering assembly can transform a simple snack into a crowd-pleasing masterpiece.
Prep and Cook Time
- Preparation: 15 minutes
- Cooking: 10 minutes
- Total Time: 25 minutes
yield
Makes 12 juicy sliders, perfect for parties or family meals.
Difficulty Level
Medium: Requires basic skills but offers plenty of room for creative variations.
Ingredients
- 1 lb ground chuck (80/20 blend preferred for juiciness)
- ½ lb ground brisket (for rich flavor and tender texture)
- ½ lb ground short rib (adds bold umami and moisture)
- 1 tsp kosher salt
- ½ tsp freshly cracked black pepper
- 1 tsp Worcestershire sauce
- 12 slider buns, lightly toasted
- Butter (for toasting buns)
Instructions
- Combine the Meat: in a large bowl, gently mix the ground chuck, brisket, and short rib-avoid overworking to keep a tender bite. Add salt, pepper, and Worcestershire sauce and fold just until evenly distributed.
- Form Patties: Divide the beef blend into twelve equal portions,about 3 ounces each. shape into small patties about 3 inches wide, making a slight indentation at the center with your thumb. This prevents puffing while cooking.
- Preheat Your Grill or Skillet: Set to medium-high heat and brush butter on the slider buns to toast until golden brown. Watch closely: about 1-2 minutes per side for that buttery crust.
- Cook the Patties: Place sliders on the hot surface.Cook 3-4 minutes per side for medium doneness, flipping once. avoid pressing down to retain juices.
- Rest and Assemble: Let the patties rest 3 minutes on a plate, allowing juices to redistribute. Then layer each on the toasted buns with your favorite toppings and sauces.
Tips for Success
- Blend for balance: The combination of chuck, brisket, and short rib delivers unbeatable flavor and juiciness – 80/20 chuck alone is classic but the added brisket and short rib add complexity and moisture.
- Avoid overpacking: Too compact patties turn dense and dry. Handle gently to keep that light, tender texture.
- Indent the center: This little trick ensures the slider cooks flat and looks perfect-no rounded bumps!
- Rest your meat: Let sliders rest briefly to lock in their juicy goodness before assembly.
- make ahead: Patties can be formed and refrigerated up to 4 hours before cooking-just cover with plastic wrap.
Creative toppings and Sauces to Elevate Your Beef Sliders
Why stop at a classic slider when the possibilities are endless? Try caramelized onions kissed with a touch of balsamic for sweet sophistication, or add a tangy crunch with kimchi. Creamy blue cheese crumbles balance the savory beef beautifully, while a smoky chipotle mayo brings a warm kick. For freshness, nothing beats crisp arugula or pickled jalapeño slices.
Serving Suggestions
Serve your sliders on a rustic wooden board lined with parchment for an inviting spread. Garnish with fresh herbs like chopped chives or parsley for that extra pop of color and fragrance. Pair with a side of sweet potato fries or a vibrant slaw to round out your bite-sized bliss experience.
Cooking Techniques That Guarantee Tenderness and Bite-Sized Bliss
Mastering the technique is as crucial as the ingredients. Using a hot grill or cast-iron skillet ensures a lovely sear that locks juices inside. Cook sliders over medium-high heat-not too fast-to develop a perfect crust without drying them out. Flip only once, and let the meat rest after cooking; these steps ensure every slider melts in your mouth with bold, juicy satisfaction.

| Nutrient | Per Slider |
|---|---|
| Calories | 250 kcal |
| Protein | 18 g |
| carbohydrates | 15 g |
| Fat | 14 g |
For more kitchen adventures, check out our article on how to choose the perfect burger buns and boost your slider game further. For an in-depth look at beef cuts and blends, Beef: It’s What’s For Dinner is an authoritative resource.
Q&A
Q&A: Bite-Sized Bliss – The Ultimate Guide to Beef Sliders Fun
Q1: What exactly are beef sliders, and why are thay so beloved?
A1: Beef sliders are miniature-sized burgers, typically around 2 to 3 inches in diameter. Think of them as the adorable little siblings of classic cheeseburgers-packed with big flavor in a small package. Their charm lies in their playful size, perfect for snacking, sharing, and sampling multiple flavor combos without the guilt of a full-sized burger. They’ve become beloved becuase they turn a simple meal into a fun, interactive experience that’s perfect for parties, casual dinners, or even gourmet tasting menus.
Q2: What makes sliders different from regular burgers?
A2: It’s all about scale and style. Sliders are intentionally tiny, encouraging bite-sized enjoyment-a few bites and you’re done! this miniaturization lets chefs experiment with bold toppings and unique sauces that might overwhelm a larger burger. Also, sliders often feature fluffier buns and juicier patties, making each morsel delightfully balanced. The size invites social eating-you can have a stack of different sliders and savor a variety of flavors without overdoing it.
Q3: Can you share some creative ways to jazz up beef sliders?
A3: Absolutely! The beauty of sliders is their versatility. You can go classic with cheddar, caramelized onions, and a dash of ketchup, or venture into culinary artistry:
- Spicy Sriracha Sliders: Beef patty topped with pepper jack cheese, pickled jalapeños, and a swirl of sriracha mayo.
- Sweet & Savory BBQ Sliders: Smothered in smoky BBQ sauce,topped with crispy onion rings and a sliver of sharp cheddar.
- Gourmet Blue Cheese Sliders: Crumbled blue cheese melding with caramelized pears and arugula for an elegant twist.
The key is layering textures and flavors that pop in that small, perfect bite.
Q4: How do you ensure the patties remain juicy and flavorful despite their small size?
A4: Since sliders cook fast,maintaining juiciness is all about the patty mix and technique. Use ground beef with around 20% fat content for richness. avoid overworking the meat when forming patties-gently shape them just enough to hold together. Season well but simply with salt and pepper. Cooking quickly over medium-high heat locks in juices; resist the urge to press down, which squeezes moisture out. a brief rest off the heat lets flavors settle and juices redistribute for that perfect bite.
Q5: What’s the best way to serve sliders for a crowd?
A5: Sliders are party royalty because they naturally encourage communal dining. serve them on a large wooden board or tiered platter, accompanied by an array of toppings and sauces-think mini bowls of pickles, various cheeses, lettuce, tomatoes, spicy aiolis, and more. Let guests play chef, customizing their own slider combinations. Pair with crunchy fries, tangy coleslaw, or even a flight of craft beers or creative mocktails for an unforgettable tasting adventure.
Q6: Any insider tips for achieving that “wow” factor in slider presentations?
A6: Presentation is your secret sauce! Start with fresh, perfectly toasted buns for a golden glow. Use colorful garnishes-herbs like microgreens, vibrant pickles, or edible flowers-for visual zing. Stack sliders neatly or arrange them in neat rows,using small decorative toothpicks or fun mini flags to hold them together and add personality. And don’t forget the plate itself: rustic wooden boards, slate slabs, or quirky trays add texture and a vibe that screams “slider party!”
Q7: Can beef sliders be adapted for dietary preferences or restrictions?
A7: Definitely! Sliders are wonderfully adaptable. Turkey, chicken, or veggie patties can swap in seamlessly for beef. Gluten-free buns or lettuce wraps cater to gluten-sensitive diners. Dairy-free cheese and creative sauces ensure no one misses out on flavor. The small size encourages creativity and makes it easy to prepare multiple varieties to keep all your guests happy and well-fed without hassle.
Whether you’re hosting a casual get-together or aiming to impress with mini masterpieces, beef sliders bring an undeniable fun factor to the table. Bite-sized bliss is just a patty away!
Wrapping Up
As you savor the final crumbs of these mini marvels, remember: beef sliders are more than just a bite-sized treat-they’re a canvas for creativity and a passport to flavor-packed fun. Whether you’re crafting classic combos or daring to experiment with bold toppings, these tiny burgers deliver big joy with every mouthful. So next time hunger strikes or friends gather ’round,let your culinary inventiveness run wild and keep the bliss in every bite.After all, in the world of sliders, good things truly do come in small, savory packages.
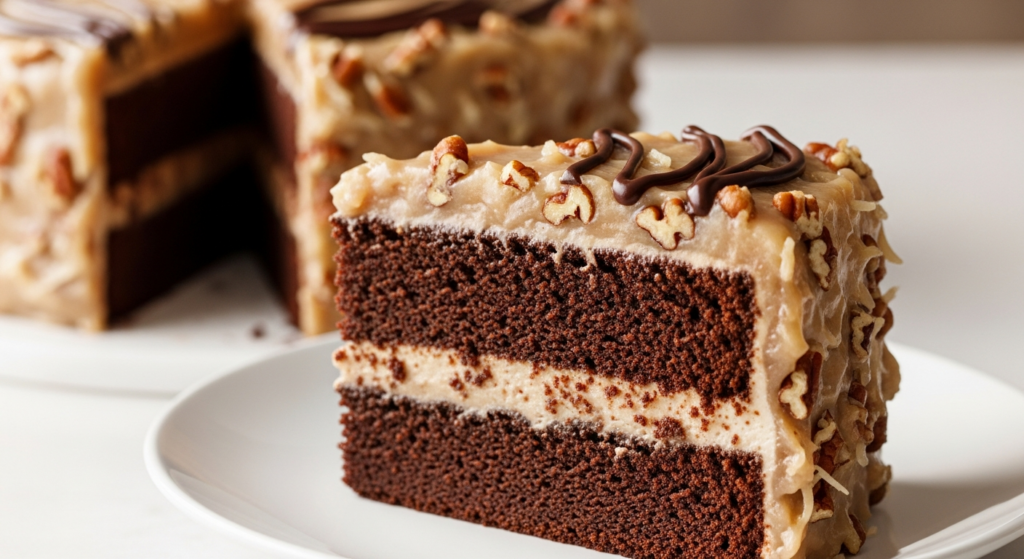
whether you’re a seasoned baker seeking to perfect your recipe or a curious sweet tooth eager to explore its origins, our ultimate guide to German chocolate cake will take you on a decadent journey.
From uncovering its surprising history to mastering each luscious layer, prepare to dive fork-first into one of the most beloved confections that has captured hearts and taste buds around the globe.
Decadent delights begin with a story steeped in rich tradition and indulgence, and German chocolate cake stands as a true testament to this.
Originating not from Germany but from the innovative kitchens of Texas in the 1950s, this iconic dessert marries a moist chocolate sponge with a luscious coconut pecan frosting, creating an unforgettable symphony of flavors and textures. The secret lies not only in its ingredients but in the careful mastery of every layer-a celebration of decadence that brings warmth to any occasion.
Prep and Cook Time
- Preparation: 30 minutes
- Baking: 30-35 minutes
- Cooling and Frosting: 45 minutes
Yield
Serves 12 generous slices
Difficulty Level
Medium – Perfect for confident home bakers aiming to impress
Ingredients
- For the Moist chocolate Sponge:
- 1 cup warm water (110°F/43°C)
- 4 oz German’s Sweet Chocolate, chopped
- 2 cups all-purpose flour, sifted
- 1 ½ tsp baking soda
- ½ tsp salt
- ¾ cup unsalted butter, softened
- 1 ¾ cups granulated sugar
- 3 large eggs, room temperature
- 1 tsp vanilla extract
- 1 cup buttermilk, room temperature
- For the Signature Coconut Pecan Frosting:
- 1 cup evaporated milk
- 1 cup granulated sugar
- 3 large egg yolks, lightly beaten
- ½ cup unsalted butter
- 1 tsp vanilla extract
- 1 ½ cups sweetened shredded coconut
- 1 cup chopped pecans, toasted
Instructions
- prepare the Chocolate Base: In a small saucepan, combine warm water and German’s sweet Chocolate. Stir over low heat until the chocolate melts fully and the mixture is smooth. Set aside to cool.
- Mix Dry Ingredients: In a medium bowl, whisk together sifted flour, baking soda, and salt. This ensures an even rise and tender crumb.
- Cream Butter and Sugar: In a large mixing bowl, beat the softened butter with granulated sugar on medium speed until light and fluffy-about 3-4 minutes.
- Add Eggs: Incorporate the eggs one at a time, mixing well after each addition to maintain a smooth batter. Stir in the vanilla extract.
- Combine Wet and Dry Mixtures: Alternate adding the dry ingredients and buttermilk into the butter mixture, beginning and ending with dry ingredients. Fold in the melted chocolate mixture until just combined; avoid overmixing to keep the sponge tender.
- Bake: Pour the batter evenly into two greased and floured 9-inch round pans. Bake at 350°F (175°C) for 30-35 minutes or until a toothpick inserted in the center comes out clean. Cool pans on wire racks for 10 minutes, then invert cakes to cool fully.
- Prepare the Coconut Pecan Frosting: In a medium saucepan, whisk together evaporated milk, sugar, and egg yolks. Add butter and cook over medium heat, stirring constantly until the mixture thickens and turns golden, approximately 12 minutes. Remove from heat and stir in vanilla extract, coconut, and pecans. Cool until spreadable.
- Assemble the Cake: place one cake layer on a serving plate. Spread a generous amount of frosting over the top. Add the second layer and finish by frosting the top and sides. Let the cake sit for at least 30 minutes before slicing to allow the flavors to meld beautifully.
Tips for Baking and Serving Like a Pro: Mastering the Perfect Moist Chocolate Sponge
- Use Room Temperature Ingredients: This helps achieve a smooth and well-emulsified batter,resulting in an airy,moist sponge.
- Choose the Right Chocolate: Authentic German’s Sweet Chocolate is key for traditional flavor. If unavailable, use a high-quality unsweetened baking chocolate.
- Don’t Overmix: Fold wet and dry ingredients gently to avoid gluten development, keeping the sponge tender.
- Test for Doneness: Insert a toothpick near the center of each cake.Moist crumbs should cling slightly but no wet batter.
- toast Nuts for Extra Flavor: Lightly toast pecans in a dry pan until fragrant to intensify flavor and crunch.
- Make-Ahead Frosting: The coconut pecan frosting can be prepared a day ahead and refrigerated. Bring to room temperature and stir before frosting.
crafting the Signature Coconut Pecan Frosting
The magic of German chocolate cake lies undeniably in its frosting-a tactile, rich blend of toasted pecans and chewy coconut nestled in a butter-sweetened custard. Cooking this frosting low and slow requires patience, stirring constantly to prevent curdling and achieve that classic glossy, thick consistency. The resultant frosting offers a textural contrast that elevates the moist chocolate sponge into a truly decadent dessert.
Serving Suggestions
- Slice with a sharp serrated knife to maintain clean layers.
- Garnish with extra toasted pecans or a sprinkle of finely shredded coconut for additional visual appeal.
- Serve alongside freshly brewed coffee or a rich glass of cold milk to balance sweetness.
- For an elegant touch, drizzle melted dark chocolate over the top just before serving.
| Nutrition per Slice | Calories | Protein | Carbohydrates | Fat |
|---|---|---|---|---|
| German Chocolate Cake | 420 kcal | 5 g | 48 g | 22 g |
Embrace the art of baking with these classic chocolate desserts and deepen your culinary repertoire. For past insight into this famed treat, visit the History Channel’s deep dive on German Chocolate cake.

Q&A
Q&A: Decadent Delights – Ultimate Guide to German Chocolate Cake
Q1: What exactly is German Chocolate Cake?
A1: Contrary to popular belief, German Chocolate Cake isn’t actually German! It’s named after Sam German, an American who developed a sweet baking chocolate in the 19th century. This cake is a luscious layer cake known for its moist, rich chocolate base crowned with a heavenly coconut-pecan frosting.The combination is a symphony of textures and flavors-a true American classic with a hint of Southern charm.
Q2: What makes the frosting on German chocolate Cake so special?
A2: The frosting is the showstopper-a gooey, caramelized mixture of coconut, toasted pecans, evaporated milk, sugar, butter, and egg yolks. It’s like biting into sweet, nutty clouds that perfectly balance the bittersweet chocolate layers beneath. The texture is slightly chunky yet creamy,delivering both crunch and chew in every forkful.
Q3: Can I use regular chocolate instead of German’s chocolate?
A3: Absolutely! If you can’t find the original German’s sweet baking chocolate, look for a good-quality sweet or milk baking chocolate with a similar sweetness level. Some bakers even combine semisweet chocolate with sugar to mimic its unique balance. the key is to maintain that sweet chocolate flavor without overpowering the frosting’s delicate character.
Q4: How do I achieve the perfect moistness in the cake layers?
A4: Moisture is king here. Use buttermilk or whole milk to enrich the batter and add a splash of brewed coffee to deepen the chocolate notes. Be sure not to overbake; a toothpick should come out with a few moist crumbs. wrapping the cake layers in plastic wrap while warm can also lock in moisture, making your cake irresistibly tender.
Q5: Is German Chocolate Cake difficult to make at home?
A5: It’s a delightful culinary adventure! While the frosting requires some attention-cooking it slowly until it thickens just right-it’s totally manageable with patience. The cake layers themselves are straightforward. The reward? A show-stopping dessert that tastes like a bakery masterpiece but made with your own hands.
Q6: What occasions suit German Chocolate Cake best?
A6: Any celebration calling for decadence! Birthdays, holidays, weddings, or just a weekend indulgence. Its rich texture and showy presentation make it perfect for impressing guests or treating yourself to a slice of pure bliss.
Q7: Can I make German Chocolate Cake vegan or gluten-free?
A7: Yes, with some clever swaps! For vegan versions, replace eggs with flax or chia seeds and use plant-based milk and butter alternatives. For gluten-free, almond or oat flour blends work wonderfully. Keep in mind,texture and flavor may vary slightly,but the essence of that coconut-pecan frosting remains the heart of the cake.
Dive into German Chocolate Cake and discover why this decadent delight holds a cherished place in dessert lore-where tropical sweetness meets chocolatey richness in perfect harmony. Ready your bowls, preheat your oven, and prepare your palate for a slice of cake heaven!
Wrapping Up
As we close the chapter on the luscious world of German chocolate cake, may your kitchen be filled with the sweet aroma of toasted coconut and rich, velvety chocolate. this decadent delight is more than just a dessert-it’s a celebration of textures, flavors, and tradition all baked into one irresistible slice. Armed with this ultimate guide, you’re ready to create your own masterpiece that honors its storied past while delighting modern palates. So,whether you’re a seasoned baker or a curious chocolate enthusiast,dive in fearlessly,and let each bite transport you to a place where indulgence is not just allowed-it’s absolutely essential.Happy baking!
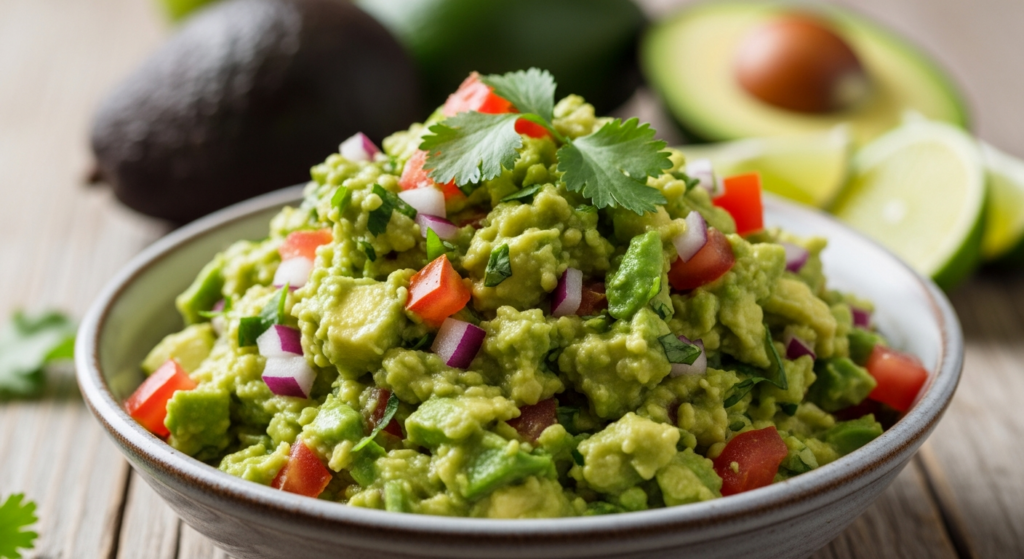
Choosing the perfect avocados is the cornerstone of achieving a creamy and luscious guacamole that captivates the senses from the very first bite. Fresh, ripe avocados with just the right balance of softness and firmness deliver that silky texture and subtle, buttery flavor essential to every scoop. This guide will unlock your ability to select and prepare avocados so your guacamole reaches its fullest potential, celebrating the vibrant harmony of flavors and textures.
Prep and Cook Time
- Planning: 10 minutes
- Cooking: 0 minutes (no cooking required)
- Total Time: 10 minutes
Yield
Serves 4 as an appetizer or snack.
Difficulty Level
Easy – perfect for beginners and seasoned home cooks alike.
Ingredients
- 3 ripe Hass avocados, peeled and pitted
- 1 small red onion, finely diced (about ¼ cup)
- 1 large ripe tomato, seeded and diced
- 1-2 fresh jalapeños, seeded and minced
- 1 handful fresh cilantro, finely chopped (about 2 tbsp)
- Juice of 2 fresh limes (about 3 tbsp)
- 1 tsp sea salt, adjust to taste
- Fresh ground black pepper, to taste
- Pinch of ground cumin (optional, for a warm hint)
Instructions
- Start by gently squeezing the avocados to check ripeness; they should yield slightly when pressed but not be mushy.
- Slice the avocados in half and remove the pit carefully. Scoop the flesh into a medium bowl.
- Mash the avocado using a fork or potato masher, leaving a creamy texture with a few slightly chunky bits for delightful mouthfeel.
- Mix in the finely diced red onion and tomato, adding vibrant color and a fresh bite-a balance of creamy and crisp.
- Fold in the jalapeño and cilantro, distributing thier bright heat and herbaceous notes evenly throughout.
- Pour in the freshly squeezed lime juice-this not only brightens the entire dish but also slows down avocado browning.
- Season with sea salt, black pepper, and cumin to round out the flavors, tasting frequently to fine-tune the balance.
- Let the guacamole rest at room temperature for 10 minutes before serving, allowing flavors to meld beautifully.
Tips for Success: Mastering the Art of Balancing Flavors and Textures
- Avocado ripeness is key: Avoid overly soft or green avocados-they’ll produce a guacamole that’s either watery or bitter.
- Layer textures: Adding diced tomato and onion gives refreshing contrast to creamy avocado, elevating every bite.
- Lime juice freshness: Always use freshly squeezed juice for acidity that enlivens the guacamole’s profile without overpowering it.
- Control heat: Adjust jalapeños incrementally; start mild, especially if serving to guests unfamiliar with spice.
- Herbs boost vibrancy: Cilantro is conventional, but for a twist, try fresh basil or chives to experiment with the herbaceous balance.
Insider Tips for Enhancing Freshness and Vibrancy
- Use an avocado ripeness guide: Gently press near the stem; slight give signals perfect ripeness.
- Store guacamole properly: Press plastic wrap directly onto the surface to minimize air exposure and keep it vibrant for longer.
- Add a touch of extra virgin olive oil right before serving to add glossy sheen and a fruity depth to the flavor.
- To prevent browning, add a small finely chopped red onion on top as a natural antioxidant shield.
- For a brighter guacamole, include diced mango or pomegranate seeds, introducing juicy bursts of sweetness that contrast beautifully.
Creative Twists to Elevate Your Guacamole Experience
- Smoky chipotle kick: Stir in chipotle in adobo sauce for a deep smoky heat.
- Crunch factor: Toss in toasted pepitas or crushed tortilla chips for texture bursts.
- Tropical flair: Add diced pineapple or mango for a sweet-savory fusion.
- Cheese inclusion: Crumbled cotija or feta sprinkled on top lends a salty tang.
- Herb variations: Mix in fresh mint or basil for unexpected aromatic lifts.
Serving Suggestions
present your guacamole in a rustic bowl adorned with a sprinkling of paprika or fresh chopped cilantro. Serve alongside homemade tortilla chips, crunchy vegetable sticks, or as a vibrant topping on tacos and grilled meats. To create an inviting spread, pair with fresh pico de gallo, warm quesadillas, or zesty shrimp ceviche for a fiesta of flavors that dance on the palate.
| Nutrient | Amount per Serving |
|---|---|
| Calories | 160 kcal |
| Protein | 2 g |
| Carbohydrates | 9 g |
| Fat | 15 g (mostly healthy unsaturated) |

For more inspiration on Mexican appetizers, explore our guide to easy Mexican taco fillings. To dive deeper into avocado health benefits, visit Harvard T.H. Chan School of Public Health.
Q&A
Q&A: The Ultimate Guide to Fresh, Best Ever Guacamole Bliss
Q1: What makes guacamole truly fresh and irresistible?
A1: Fresh guacamole is all about balance and quality. The foundation is ripe, creamy avocados-smooth to the touch but slightly firm to the bite. Freshness shines through vibrant ingredients like zesty lime juice, crisp cilantro, diced red onions, and a hint of fiery jalapeño. Combine these with a pinch of salt and a little garlic, and you’ve got a dip that’s bursting with life and flavor.
Q2: How do I pick the perfect avocados for guacamole?
A2: Look for avocados with a dark, nearly black skin that yield slightly under gentle pressure-think buttery but not mushy. If they’re too firm, they need a day or two to ripen; too soft and they might be overripe and bitter inside. The texture is key: creamy, not grainy, to create that silky, dreamy guacamole base.
Q3: Can I prepare guacamole ahead of time without it turning brown?
A3: Guac’s natural enemy is oxidation,which causes browning. To keep it fresh, press a piece of plastic wrap directly onto the surface to block air, or add a thin layer of lime juice on top. Storing it in an airtight container and refrigerating helps too-but for the BEST flavor and color, serve it quickly after mixing.
Q4: What secret ingredient can elevate my guacamole from good to unforgettable?
A4: Many guac chefs swear by a dash of smoky chipotle powder or a tiny spoonful of roasted garlic to deepen the flavor profile. Others love a sprinkle of pomegranate seeds for a surprising juicy pop or diced mango for a sweet contrast. These creative twists add layers and personality to your guacamole bliss.
Q5: Is there a perfect texture for guacamole? Chunky or smooth?
A5: Texture is a matter of personal joy! Some crave a chunky style, with discernible avocado chunks and crunchy onion bits for a satisfying bite. Others prefer a silky, smooth spread, perfect for dipping or layering. Aim for consistency that lets your fresh ingredients shine-whether rustic or refined, the ultimate guacamole is made your way.
Q6: What’s the best way to serve guacamole to wow guests?
A6: Presentation is the final flourish. Serve your guacamole in a colorful bowl, garnished with fresh cilantro leaves, a lime wedge, and a sprinkle of chili flakes or seeds. Pair it with crispy tortilla chips, fresh veggie sticks, or use it as a luscious topping on tacos and grilled meats.Freshness meets flair-guacamole bliss on a platter!
Insights and Conclusions
As you embark on your guacamole adventures,remember that the magic lies in fresh ingredients,balanced flavors,and a touch of your own creativity. Whether you’re smashing ripe avocados under the sun or adding a surprise twist from your pantry, this guide has equipped you with everything to craft the freshest, most blissful guacamole every time.So grab your favorite chips, gather your loved ones, and dive into that creamy, zesty goodness – because the ultimate guacamole experience isn’t just a recipe, it’s a celebration of flavor, texture, and joy in every bite. Happy dipping!
But what if you could elevate this beloved dessert from simply appetizing to absolutely unforgettable? Welcome to The Ultimate Guide to Making the Best Ever Banoffee Pie, where we’ll unravel the secrets, share expert tips, and walk you through every step to create a banoffee pie that dazzles with every bite.
Whether you’re a seasoned baker or a curious newcomer, prepare to embark on a sweet adventure that transforms humble ingredients into a show-stopping masterpiece. Let’s get baking!
The Ultimate Guide to Making the Best Ever Banoffee Pie begins with selecting the perfect foundation for this indulgent treat. Every element – from the biscuit base to the luscious caramel and airy whipped cream – must harmonize to capture that iconic blend of rich, sweet, and creamy textures. Let’s dive into how to choose and prepare each component to create a banoffee pie that’s nothing short of spectacular.
Prep and Cook Time
- Preparation: 25 minutes
- Chilling Time: 2 hours (minimum)
- Total Time: 2 hours 25 minutes
Yield
Perfect for sharing, this recipe yields 8 generous slices of banoffee pie.
difficulty Level
Medium – approachable with simple techniques but rewarding attention to detail.
Ingredients
- For the Biscuit Base:
- 250g digestive biscuits (crushed finely)
- 125g unsalted butter (melted)
- 1 tbsp light brown sugar (optional, for extra caramel note)
- For the Silky caramel:
- 400g canned sweetened condensed milk (for homemade dulce de leche)
- 50g unsalted butter (softened)
- 2 tbsp dark muscovado sugar (for deeper flavor)
- For the Topping:
- 300ml heavy whipping cream (cold)
- 2 tbsp icing sugar (sifted)
- 1 tsp vanilla extract
- 2 ripe bananas (sliced just before serving)
Instructions
- Mastering the Art of Creating the Ideal Biscuit Base: Start by placing the digestive biscuits in a food processor and blitz until you have fine crumbs. Alternatively, place crushed biscuits in a sealed bag and bash with a rolling pin until fine. Combine the crumbs with melted butter and light brown sugar,stirring until evenly moistened. Press the mixture firmly and evenly into the base and sides of a 23cm springform tin or pie dish. Use the back of a spoon to compact it well, ensuring a sturdy foundation. Chill in the fridge for 30 minutes.
- Crafting Silky Smooth Caramel to Elevate Your Pie: While your base chills, prepare the caramel. To achieve the luscious caramel texture essential to banoffee pie, gently simmer the unopened can of sweetened condensed milk in a deep saucepan filled with water (water level should always cover the can) for 2 to 2.5 hours. Keep the heat low to prevent scorching and add water as needed. Once cooled, open carefully and stir in softened butter and muscovado sugar until glossy and thickened. Alternatively, use homemade dulce de leche or pre-made caramel sauce, but nothing beats the rich, creamy depth from this slow method.
- Assembling the Layers: Remove the biscuit base from the fridge and spoon over the caramel layer. Spread it evenly to the edges for full coverage. Return to the fridge to firm up for another hour, allowing the caramel to meld beautifully with the buttery crust.
- Whipping Cream to light and Fluffy Perfection: Just before serving, pour cold heavy cream into a large chilled bowl. Whip using an electric mixer on medium speed, gradually adding icing sugar and vanilla extract as the cream thickens. Continue whipping until soft peaks form-be careful not to overwhip or it will turn grainy. Gently fold the cream over the caramel layer with a spatula, creating a billowy cloud-like finish.
- Final Touch: Slice ripe bananas just before serving to preserve freshness and layer them decoratively over the whipped cream. For an elegant finish, dust lightly with cocoa powder or sprinkle grated dark chocolate.
Tips for Success
- use fresh, firm bananas to avoid mushy texture. If preparing ahead, keep banana slices seperate and add shortly before serving.
- When pressing the biscuit base, the tighter it’s packed, the crisper it will stay, giving a pleasant contrast to the soft topping.
- Simmering condensed milk for homemade caramel requires patience-never allow the water to boil dry.Always keep the can fully submerged to prevent explosions and ensure safety.
- For a refined flavor, replace digestive biscuits with graham crackers or add a pinch of sea salt to the base for a salted caramel twist.
- Make the pie a day ahead to allow the flavors to marry – it tastes even better after resting overnight!
Serving Suggestions
Serve chilled with a sprig of fresh mint or a handful of toasted chopped pecans for added crunch. A drizzle of chocolate or caramel sauce over the top adds irresistible flair. Pair this decadent dessert with strong coffee or a fruity dessert wine for a truly memorable finale to your meal.

| Nutrient | Per Serving (1 slice) |
|---|---|
| calories | 420 kcal |
| Protein | 5 g |
| Carbohydrates | 50 g |
| Fat | 22 g |
For an in-depth look at caramel-making techniques, see this Serious Eats caramel guide. Also, explore our collection of decadent dessert recipes for more inspirations.
Q&A
Q&A: The Ultimate Guide to Making the Best Ever Banoffee Pie
Q1: What makes a banoffee pie truly “the best ever”?
A1: The magic lies in the perfect harmony of textures and flavors-the buttery, crumbly biscuit base; the rich, velvety toffee layer; the fresh, sweet bananas; and the light, freshly whipped cream crowning it all. The best banoffee pie balances sweetness with a hint of caramel depth, ensuring every bite is decadent yet not overpowering.
Q2: what’s the ideal biscuit base for a banoffee pie?
A2: Digestive biscuits are classic for their slightly sweet, malty flavor and crumbly texture, but you can experiment with graham crackers or shortbread for a richer bite. The trick is to crush them finely and mix with melted butter until the mixture holds together firmly once chilled-this forms the crunchy, buttery foundation every great banoffee pie needs.
Q3: How do I make the perfect toffee layer? Should I use canned dulce de leche or homemade toffee?
A3: Both have their charm. Canned dulce de leche is convenient and reliably sweet, but homemade toffee made by simmering sweetened condensed milk until it thickens has an unbeatable homemade depth and caramel richness.Patience is key-it takes about 2-3 hours on a low simmer, but the flavor payoff is worth it.
Q4: What’s the secret to juicy, perfectly sliced bananas?
A4: Choose ripe but firm bananas so they hold their shape without turning mushy. Slice them just before assembling the pie to prevent browning, or briefly toss slices in lemon juice to keep them fresh and vibrant.
Q5: How should I prepare the cream topping? Should I stabilize it?
A5: Freshly whipped cream is best-light, airy, and subtly sweetened with a touch of vanilla extract. If you want your topping to hold its shape longer,gently fold in a small amount of mascarpone or powdered gelatin. This keeps the cream luscious and stable for impressive presentation.
Q6: Any tips for assembling the banoffee pie like a pro?
A6: Layer with mindfulness! Start by firmly pressing the biscuit base in the tin, chill it well, then spread the toffee layer evenly for a smooth canvas. Arrange the banana slices carefully on top so they overlap slightly, creating an inviting mosaic. crown the pie generously with whipped cream and, if you like, sprinkle with chocolate shavings or a dusting of cinnamon.
Q7: Can I prepare banoffee pie in advance? How long will it keep?
A7: Absolutely! Banoffee pie actually benefits from a few hours-or even overnight-to let the flavors meld and the toffee soften the biscuit base slightly. Store it covered in the fridge for up to 2 days. After that,the bananas might start browning and the base could lose its crispness.
Q8: Any creative twists to elevate the classic banoffee pie?
A8: Definitely! Add a splash of espresso or coffee liqueur to the toffee for subtle bitterness, sprinkle toasted nuts for crunch, or incorporate a layer of crushed cookies dipped in cocoa powder for a chocolatey surprise. For a tangy contrast, a smear of cream cheese or a few raspberries atop the cream works wonders.With these insider insights, your next banoffee pie will be nothing short of legendary-sweet, lush, and utterly unforgettable!
In Retrospect
Now that you’ve unlocked the secrets to crafting the best ever banoffee pie, it’s time to bring this luscious dessert from your kitchen to the center of your table. Whether you’re impressing guests or treating yourself to a slice of indulgence, this rich symphony of bananas, toffee, and cream promises to delight every palate. Remember, the magic lies not just in the ingredients, but in the care and creativity you bring to the process. So grab your whisk, savor each step, and let your banoffee masterpiece become a beloved tradition-one bite at a time. Happy baking!

]]>
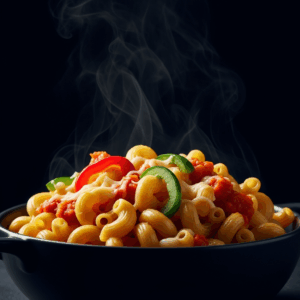
Creamy comfort begins with selecting the right gluten-free pasta that not only holds the sauce well but also delivers that luscious, velvety mouthfeel we crave in mac and cheese. Gluten-free noodles can vary widely-from corn and rice-based to alternative flours like quinoa or chickpea-and the key is finding one that maintains tenderness without becoming mushy.
Choosing the Perfect Gluten-Free Pasta for Ultimate Creaminess
Opt for pasta shapes with ridges or tubes, like gluten-free penne or cavatappi, which trap every bit of creamy sauce. Brands using a blend of rice flour and tapioca starch often strike the best balance in texture. Cook pasta just shy of al dente-reserve some pasta water-to finish cooking gently with the sauce, melding flavors and preventing dryness.
Crafting the Richest Sauce with Dairy and Non-Dairy Alternatives
the heart of a truly creamy mac and cheese sauce lies in the dairy-or thoughtfully chosen dairy-free substitutes. Start with a classic roux of butter and gluten-free flour, than whisk in warm milk or creamy non-dairy options such as oat milk or cashew cream. Layer in sharp white cheddar or smoked gouda for depth,complemented by melty mozzarella for stretch and creaminess.
To elevate the texture, stir in a dollop of cream cheese or vegan cream cheese alternative just before combining with the pasta, ensuring a silkier finish that clings beautifully.
Flavor Boosters and Mix-Ins to Elevate Your Mac and Cheese
Don’t shy away from bold add-ins.A sprinkle of smoked paprika, a pinch of ground mustard powder, or a dash of hot sauce can cut through richness and awaken the palate.For extra umami, stir in caramelized onions, crispy pancetta, or sautéed mushrooms. Fresh herbs like chives and thyme brighten each bite, while toasted breadcrumbs with a drizzle of olive oil create irresistible crunch atop your baked masterpiece.
Tips for Achieving the Ideal Bake and Serving Suggestions
After mixing pasta and sauce, transfer to a buttered casserole dish. Top with a blend of shredded cheese and toasted gluten-free breadcrumbs for that golden, bubbly crust. Bake at 375°F (190°C) for 20-25 minutes until the edges are bubbling and the top is perfectly browned.
Serve piping hot, garnished with finely chopped parsley or microgreens for freshness and color contrast. Pair with a crisp green salad or roasted seasonal vegetables to balance indulgence with vibrancy. For an extra touch of decadent comfort, swirl in a spoonful of truffle oil just before serving.
Prep and Cook Time
- Prep: 15 minutes
- Cook: 35 minutes
- Total: 50 minutes
Yield
Serves 6 generous portions
Difficulty Level
Medium – approachable for home cooks eager to try gluten-free recipes with confidence
Ingredients
- 12 oz gluten-free pasta (penne or cavatappi preferred)
- 4 tbsp unsalted butter
- 1/4 cup gluten-free all-purpose flour
- 3 cups whole milk or unsweetened oat milk
- 1 cup sharp white cheddar, shredded
- 1 cup smoked gouda, shredded
- 1/2 cup cream cheese, softened
- 1/2 tsp ground mustard powder
- 1/2 tsp smoked paprika
- Salt and freshly ground black pepper, to taste
- 1 cup gluten-free breadcrumbs
- 2 tbsp olive oil
- Fresh parsley, chopped, for garnish
Instructions
- Cook the Pasta: Bring a large pot of salted water to boil. Cook gluten-free pasta according to package instructions until just shy of al dente. Reserve 1 cup pasta water, drain, and set aside.
- Make the Roux: In a large saucepan over medium heat, melt butter. Whisk in gluten-free flour and cook for 2-3 minutes, stirring constantly to avoid lumps and to toast the flour slightly.
- Add the Milk: Gradually whisk in warm milk or oat milk, continuing to whisk until the mixture thickens, about 5-7 minutes. Lower heat to avoid scorching.
- Incorporate the Cheese: Remove from heat. Stir in shredded cheddar, gouda, and cream cheese until fully melted and smooth. Add ground mustard, smoked paprika, salt, and pepper. If sauce seems too thick, whisk in reserved pasta water a little at a time for desired consistency.
- Combine Pasta and Sauce: Toss cooked pasta into the cheese sauce, ensuring each piece is luxuriously coated. Adjust seasoning if needed.
- Prepare Topping: In a small bowl, combine gluten-free breadcrumbs with olive oil, tossing to coat evenly.
- Bake: Transfer macaroni and cheese to a buttered baking dish. Sprinkle breadcrumb topping evenly. Bake in preheated oven at 375°F (190°C) for 20-25 minutes, or until golden and bubbly.
- Garnish and Serve: Allow to cool briefly before garnishing with chopped parsley. Serve warm to enjoy maximum creaminess.
Tips for Success
- Use freshly shredded cheese instead of pre-shredded for smoother melting.
- Reserve pasta water to adjust sauce consistency-gluten-free pasta can absorb liquids differently.
- For dairy-free versions, substitute butter with coconut oil and use fortified oat or almond milk plus vegan cheeses.
- Make ahead: Prepare up to sauce step,mix pasta in,cover,and refrigerate. Add toppings and bake when ready.
- If sauce appears grainy, whisk vigorously off heat or blend with an immersion blender for creaminess.
Serving Suggestions
Present your mac and cheese with a crisp arugula salad dressed in lemon vinaigrette to cut richness. A side of roasted Brussels sprouts or garlic sautéed greens complements textures and adds color. For a fun twist,drizzle a little truffle oil over each serving for an earthy aroma that elevates comfort food to gourmet.
| Nutrient | Per Serving |
|---|---|
| Calories | 420 kcal |
| Protein | 18 g |
| Carbohydrates | 44 g |
| Fat | 18 g |

Q&A
Q&A: Creamy Comfort - Your Guide to Gluten-Free Mac & Cheese
Q1: What makes gluten-free mac & cheese different from the customary version?
A1: The star difference lies in the pasta and thickening agents. Traditional mac & cheese typically uses wheat-based pasta and a roux made with wheat flour. Gluten-free versions swap the pasta for alternatives like rice, corn, or chickpea-based noodles, and thicken the cheese sauce using gluten-free flours or cornstarch. The result? All the creamy, cheesy comfort without the gluten!
Q2: Can gluten-free mac & cheese be just as creamy and delicious?
A2: Absolutely! Achieving that luscious, melt-in-your-mouth texture is all about technique and ingredients. Using good quality gluten-free pasta, combining sharp and mild cheeses, and incorporating a splash of cream or milk creates a silky sauce. A little patience while stirring and baking helps the flavors meld into pure comfort heaven.
Q3: Are there any special tips for cooking gluten-free pasta for mac & cheese?
A3: Yes! Gluten-free pasta tends to be more delicate, so avoid overcooking. Cook it just until al dente, then rinse briefly under cold water to stop the cooking process and prevent stickiness. Tossing the noodles with a tiny bit of oil before adding the cheese sauce can also help maintain that perfect texture.
Q4: Which cheeses work best in gluten-free mac & cheese?
A4: A blend is key! Sharp cheddar provides that classic tang, while mozzarella or Monterey Jack adds creaminess and melt. For extra depth, try a touch of Gruyère or Parmesan. Just be sure your cheeses are naturally gluten-free-most are, but it’s always good to check labels.
Q5: Is it possible to make gluten-free mac & cheese dairy-free as well?
A5: Yes, with a bit of culinary creativity! Use dairy-free cheeses crafted for melting alongside plant-based milks like almond, oat, or cashew. Nutritional yeast can add an umami punch that mimics cheesy flavors perfectly, turning your mac & cheese into a double-friendly delight for those avoiding both gluten and dairy.
Q6: How can I add some nutritional value to my gluten-free mac & cheese without losing that creamy comfort?
A6: Sneak in veggies like pureed cauliflower or pumpkin directly into the cheese sauce-they blend seamlessly and boost nutrients. Adding steamed broccoli,peas,or spinach into the pasta before baking also adds color,texture,and vitamins without overshadowing the comforting cheesy flavor.
Q7: Are gluten-free mac & cheese recipes suitable for picky eaters?
A7: so much so! The familiar look and taste of mac & cheese frequently enough win over even hesitant eaters.Using mild cheeses and smooth sauces makes the dish approachable, and gradually adding veggies or flavorful herbs can expand their palate gently. Plus, knowing it’s gluten-free offers peace of mind for those with sensitivities.
With these tips and tasty insights, gluten-free mac & cheese goes from a special-diet necessity to a cozy classic everyone can enjoy. Creamy comfort truly has no boundaries!
to Wrap It Up
As you embark on your journey to creamy, dreamy gluten-free mac & cheese, remember that comfort food knows no boundaries.Whether you’re navigating dietary needs or simply craving that velvety embrace of cheese and pasta, this guide has shown that indulgence and health can coexist deliciously. So go ahead-whip up your perfect batch, savor each bite, and redefine what cozy means in every creamy forkful. After all, the best comfort food is the one made just for you.
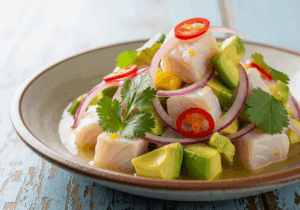
Choosing the Perfect White Fish for Your Ceviche de Pescado
When crafting the freshest ceviche de pescado, selecting the right white fish is paramount. Think of this as the canvas upon which vibrant layers of citrus and spice will paint your masterpiece. Ideal fish varieties boast a firm, flaky texture and mild flavor – allowing the marinade’s zest to shine without overshadowing the delicate seafood essence. Classic favorites include snapper, sea bass, halibut, and flounder, all prized for their pristine white flesh and clean taste.
Opt for fish labeled “sushi-grade” or “sashimi-quality” at your trusted fishmonger to ensure freshness and safety in your raw planning. Remember, freshness hear is not just a preference but a necessity; the briny citrus will “cook” the fish but can’t undo any previous spoilage. When in doubt, a quick sniff test-fresh fish smells like ocean breeze, not fish market-can save your ceviche experience.
Mastering the Marinade Citrus Balance for Optimal Flavor in Ceviche de Pescado
The magic of ceviche de pescado lies within the marinade, where citrus does more than flavor-it gently cooks. Achieving the perfect balance of acidity and subtle sweetness is key. Freshly squeezed lime juice is the hero here, its tangy brightness complemented by a touch of lemon or even grapefruit for a nuanced twist. A splash of orange juice can soften the edges, adding a whisper of natural sweetness that deepens complexity.
For a perfectly balanced marinade, blend about 1 cup of lime juice with 2 tablespoons of lemon juice and 1 tablespoon of orange juice. This harmony ensures the fish turns opaque and succulent without becoming overly mushy or sour. Add salt gradually, tasting as you go, since it both preserves texture and elevates flavor. Freshly cracked black pepper and a pinch of sugar can also round out the bouquet beautifully.
Essential Ingredients to Elevate Your Ceviche de Pescado Experience
Beyond fish and citrus, a symphony of ingredients transforms this dish into a sensation. Crisp red onions, thinly sliced and rinsed, add a sharp crunch. Brightly colored bell peppers bring subtle sweetness and texture contrast. Don’t underestimate the punch of fresh cilantro-its herbaceous notes marry perfectly with citrus. A finely diced jalapeño (or milder pepper, if preferred) introduces just enough warmth to awaken the palate.
A finishing touch of ripe avocado offers buttery richness,while a sprinkle of toasted corn kernels or crunchy tortilla chips adds irresistible texture. Sea salt flakes and freshly ground pepper should always be on standby for that last-minute seasoning tweak.
Tips for Serving and Pairing Your White Fish Delight
Present your ceviche de pescado in chilled bowls or elegant glass cups to showcase its vibrant colors. Garnish with a sprig of cilantro, thin slices of radish, or edible flowers to evoke freshness and artistry.Serve alongside crisp plantain chips or crisped tostadas for delightful crunch meets melt-in-mouth textures.
Pair this zesty dish with a crisp, citrus-forward white wine like Sauvignon Blanc or a refreshing, cold mexican beer to complement the brightness.For non-alcoholic options, a sparkling water infused with cucumber and lime elevates the experience.
prep and Cook Time
- Preparation: 20 minutes
- Marinating: 30 minutes
- Total Time: 50 minutes
Yield
Serves 4 as a refreshing appetizer or light meal.
Difficulty Level
Easy
Ingredients
- 1 lb fresh white fish (snapper,sea bass,or halibut),cubed
- 1 cup fresh lime juice (about 8 limes)
- 2 tbsp fresh lemon juice
- 1 tbsp fresh orange juice
- 1/2 medium red onion,thinly sliced and rinsed
- 1 jalapeño,seeded and finely diced
- 1/2 cup chopped cilantro
- 1/2 red bell pepper,finely diced
- 1 ripe avocado,diced
- Salt and freshly ground black pepper,to taste
- Optional: toasted corn kernels or plantain chips for serving
instructions
- Prepare the fish: Rinse the cubed white fish under cold water,then pat dry with paper towels. Place in a glass or ceramic bowl.
- Mix the citrus marinade: In a separate bowl, combine lime juice, lemon juice, and orange juice. Add salt and pepper to taste, stirring until salt dissolves.
- Marinate the fish: Pour the citrus mixture over the fish. Ensure the fish cubes are fully submerged. Cover and refrigerate for 30 minutes, or until the fish turns opaque and firm.
- Prepare vegetables: While the fish marinates, rinse the sliced red onion under cold water to mellow sharpness.Dice the bell pepper, jalapeño, and avocado, then chop the cilantro.
- Combine ingredients: Once the fish is “cooked” by the citrus,drain about half of the marinade to prevent overpowering. Fold in onions, bell pepper, jalapeño, and cilantro gently.
- Final seasoning and garnish: Adjust salt and pepper to your liking. Fold in avocado just before serving for a creamy texture.
- Serve chilled: Spoon ceviche into serving bowls.Garnish with extra cilantro sprigs or radish slices and offer toasted corn kernels or plantain chips on the side for crunch.
Chef’s Notes
- For a spicier ceviche: leave seeds in the jalapeño or add a pinch of cayenne pepper.
- Texture Tip: Avoid marinating for more than 1 hour to keep fish tender, as the acid can make it mushy.
- Make-Ahead: Prepare fish and marinade up to 6 hours ahead, but add avocado and delicate veggies just before serving.
- Substitute: If fresh fish isn’t available, use sustainably sourced frozen fish, thawed overnight under refrigeration.
Serving Suggestions
Serve this vibrant dish atop a bed of crisp butter lettuce for visual freshness or use in warm corn tortillas for ceviche tacos bursting with flavor. A drizzle of extra-virgin olive oil or a few drops of chili oil can add an enticing richness and subtle heat. Pair your ceviche with a simple cucumber and jicama salad to provide a cooling counterpoint.
| Nutrient | Per Serving | Notes |
|---|---|---|
| Calories | 180 kcal | Light and refreshing |
| Protein | 26g | High-quality lean protein |
| Carbohydrates | 8g | Mostly from vegetables and fruit juices |
| Fat | 6g | Healthy fats from avocado |

Explore more about ceviche and seafood choices in our Perfect Ceviche Techniques guide. For detailed fish safety recommendations, visit the FDA’s seafood safety page.
Q&A
Q&A: Ceviche de Pescado - A Zesty Guide to White Fish Delight
Q1: What exactly is ceviche de Pescado?
A1: Ceviche de Pescado is a vibrant Latin American dish featuring fresh white fish ‘cooked’ in citrus juice, usually lime or lemon. This zesty marinade transforms the fish’s texture and flavor, creating a refreshing and tangy appetizer that celebrates the ocean’s bounty with a citrusy punch.
Q2: Why is white fish the star of ceviche?
A2: White fish-like snapper, sea bass, or tilapia-has a mild flavor and firm flesh that soaks up the citrus marinade beautifully without overpowering the palate. Its delicate taste serves as the perfect blank canvas for bright, bold flavors like lime, cilantro, and chili.
Q3: How does citrus ‘cook’ the fish in ceviche?
A3: The acid in citrus juice denatures the proteins in the fish, similar to heat, changing its texture from raw and translucent to opaque and firm. this process effectively “cooks” the fish without heat, making ceviche a fresh and light choice to traditional cooked seafood dishes.
Q4: What are the essential ingredients in Ceviche de Pescado?
A4: At its core, you’ll need fresh white fish, freshly squeezed lime juice, chopped onions, cilantro, salt, and chili peppers for heat. Many recipes also add diced tomatoes, avocado, or cucumber to enhance texture and flavor complexity.
Q5: How long should the fish marinate in citrus juice?
A5: Depending on the size of the fish pieces and personal taste, marinating times can range from 15 minutes to 2 hours. Shorter times yield a more delicate texture, while longer marinating results in a firmer, almost cooked fish consistency. Always refrigerate while marinating to keep it fresh and safe.
Q6: Can I use any fish for ceviche?
A6: While white fish is preferred, avoid oily or strong-flavored fish like salmon or mackerel. The light, flaky texture and neutral flavor of white fish allow the citrus and herbs to shine. Always use the freshest fish possible; ceviche relies on freshness since it’s not cooked with heat.
Q7: How is ceviche traditionally served?
A7: Ceviche de Pescado is often served cold, accompanied by crunchy tortilla chips, tostadas, or saltine crackers. It’s garnished with cilantro, sliced avocado, and sometimes a side of sweet potato or corn to balance the tanginess. Perfect for summer or as a lively starter before a big meal!
Q8: Is ceviche healthy?
A8: Absolutely! Ceviche is low in calories, high in protein, and packed with vitamin C from the citrus. It’s typically made with fresh, wholesome ingredients without the need for heavy oils or sauces, making it a nutritious and flavorful choice.
Q9: Any tips for making the perfect ceviche at home?
A9: Use the freshest fish you can find, make sure your citrus juice is freshly squeezed, and taste as you go to balance acidity, salt, and spice. Keep the fish pieces bite-sized so they marinate evenly, and don’t over-marinate to avoid a rubbery texture. Lastly,serve promptly once ready for the best zesty zip!
Q10: Can ceviche be customized with other flavors?
A10: Definately! while classic Ceviche de Pescado sticks to its roots,you can experiment with tropical fruits like mango or pineapple for sweetness,or add crunchy vegetables like jicama. Just remember that balance is key-bright acidity and fresh ingredients are the heart of this ocean-inspired delight.
The Conclusion
Whether you’re a seasoned seafood enthusiast or a curious culinary explorer, ceviche de pescado offers a vibrant, refreshing dive into the world of white fish delicacies. This zesty dish, steeped in tradition yet versatile enough for modern twists, beckons you to experiment with fresh ingredients and bold flavors. As you embark on your own ceviche adventure,remember that the magic lies in the balance-the tang of citrus,the crunch of fresh vegetables,and the delicate texture of perfectly cured fish. So grab your freshest catch, a splash of lime, and let the bright, invigorating spirit of ceviche de pescado transform your kitchen into a coastal getaway. Your taste buds-and your guests-will thank you.
The Ultimate Guide to Perfectly Classic Chewy Brownies
Choosing the right ingredients and mastering technique is key to unlocking the luscious,fudgy satisfaction that every perfectly classic chewy brownie promises. From the rich aroma of premium cocoa to the subtle balance of sugar and butter, each element invites you into a world where texture and flavor unite in harmony. Whether you’re a seasoned baker or a curious beginner, this guide walks you thru everything you need to create irresistibly chewy brownies that melt beautifully in your mouth.
Prep and Cook Time
- Planning: 15 minutes
- Cooking: 25 minutes
- Total Time: 40 minutes
Yield
12 rich, decadent squares
Difficulty Level
Easy – Ideal for bakers of all skill levels
ingredients
- 1 cup unsalted butter, melted and slightly cooled
- 1 ¼ cups granulated sugar
- ¾ cup light brown sugar, packed
- 3 large eggs, at room temperature
- 2 teaspoons pure vanilla extract
- 1 cup all-purpose flour, sifted
- ¾ cup highest quality unsweetened cocoa powder (Callebaut cocoa Powder)
- ½ teaspoon fine sea salt
- ½ teaspoon baking powder
- ½ cup semi-sweet chocolate chips (optional for extra melty pockets)
Instructions
- Preheat your oven to 350°F (175°C). Lightly grease an 8×8 inch baking pan then line it with parchment paper, leaving overhang for effortless removal.
- Combine the melted butter and sugars in a large mixing bowl.Whisk vigorously until smooth and glossy, about 2 minutes.This ensures the sugars begin to dissolve and start building luscious chewiness.
- Incorporate the eggs one at a time, whisking well after each addition. Stir in the vanilla extract.
- Sift together the flour, cocoa powder, salt, and baking powder in a separate bowl. Sifting is crucial to avoid lumps and helps produce a tender crumb.
- Fold dry ingredients gently into the wet mixture using a spatula. Avoid overmixing; stop once all flour is just combined to preserve that chewy texture.
- Stir in the chocolate chips evenly to sprinkle pockets of molten chocolate throughout your brownies.
- Pour the batter into the prepared pan and smooth the top with a spatula.
- Bake for 22-25 minutes. Begin checking at 22 minutes by inserting a toothpick into the center – it should come out with moist crumbs but not wet batter. This is your key to preventing dryness.
- Cool completely in the pan set on a wire rack before slicing with a sharp knife. This resting step lets the brownies set perfectly, locking in their chewy richness.
Tips for Success
- Choosing the finest cocoa: Opt for natural unsweetened cocoa powder with a deep, intense flavor. Dutch-processed cocoa leads to a milder taste and darker color but may affect leavening. For the best chewy texture and richness, high-quality natural cocoa is your go-to.
- Master the texture: Melted butter is indispensable for chewiness, contrasting crumbly versions made with softened butter. Whisk the sugars well with butter to aerate slightly, and resist overmixing once dry ingredients are added.
- Prevent overbaking: Browning may tempt you to bake longer, but always trust the toothpick test. the brownies will continue to cook slightly as thay cool-removing them just before fully baked preserves moisture.
- Create your own twist: Stir in swirls of peanut butter, espresso powder, or a handful of coarsely chopped nuts. for toppings, sprinkle flaked sea salt or drizzle melted caramel immediately after baking for a delightful contrast.
- Make-ahead friendly: These brownies keep their texture amazingly well and can be stored airtight for up to 4 days or frozen for up to 2 months.
Serving Suggestions
The perfect square of perfectly classic chewy brownie is a treat on its own, but elevating the experience is where the fun begins. Serve warm with a scoop of vanilla bean ice cream and a sprig of fresh mint for a decadent dessert presentation. for a sophisticated snack, dust lightly with powdered sugar, or drizzle with glossy chocolate ganache and scatter toasted pecans.
Pair brownies with a robust cup of espresso or a creamy glass of cold milk to truly balance that rich, fudgy flavor.Consider layering brownies in a glass parfait with whipped cream and fresh berries for an eye-catching twist on dessert.

nutritional Details
| Nutrient | Per Serving (1 square) |
|---|---|
| Calories | 250 |
| Protein | 3g |
| Carbohydrates | 30g |
| Fat | 13g |
For more baking inspiration, explore our Decadent Chocolate Desserts collection and experiment with variations on this timeless favorite.
Q&A
Q&A: The Ultimate Guide to Perfectly Classic Chewy Brownies
Q1: What makes a brownie “perfectly classic” and chewy?
A1: A perfectly classic brownie strikes a balance between fudgy richness and just the right amount of chewiness.It’s dense and moist but not cake-like, with edges that are slightly crisp, creating that irresistible texture contrast. Key factors include using the right ratio of butter to flour, incorporating enough sugar for moisture retention, and timing the baking precisely to avoid dryness.
Q2: Which ingredients are essential for chewy texture in brownies?
A2: The stars for chewiness are brown sugar, butter, and eggs.Brown sugar’s molasses content adds moisture and softness, while butter provides fat that melts into a tender crumb.Eggs contribute structure and also add to that chewy bite. Using a combination of semi-sweet or bittersweet chocolate and cocoa powder helps deepen the flavor without drying out the batter.
Q3: Can I use all-purpose flour, or is there a better option?
A3: All-purpose flour works perfectly fine for classic chewy brownies. It provides enough gluten to hold the structure without making the brownies tough. For an even more tender texture, some bakers add a small amount of cake flour or cornstarch, but it’s optional and a subtle tweak.
Q4: How important is the baking time and temperature?
A4: Hugely important! Baking at a moderate temperature, around 325°F to 350°F (160°C to 175°C), ensures even cooking without drying. The brownies should be pulled out when a toothpick inserted comes out with a few moist crumbs-but no wet batter.Overbaking makes brownies cakey or crumbly, underbaking leads to gooey, undercooked centers.
Q5: Should I prepare the pan in a special way to get those perfect chewy edges?
A5: Absolutely. Using parchment paper or lightly greasing the pan helps with easy release. For the ideal chewy edges, a metal pan conducts heat better than glass, creating that coveted crispy border while keeping the middle soft. Some bakers even preheat the pan slightly before pouring in the batter to jump-start edge crisping.
Q6: Can I customize the flavor without ruining chewiness?
A6: Yes! Classic chewy brownies are a wonderful canvas for flavors-try adding espresso powder to intensify chocolate, a pinch of sea salt on top to balance richness, or swirl in peanut butter or caramel. Just keep mix-ins modest to preserve texture-too many add-ins can alter moisture balance and affect chewiness.Q7: How do I store brownies to maintain their chewiness?
A7: Store brownies in an airtight container at room temperature for up to 3 days to lock in moisture.For longer storage,wrap tightly and freeze; thaw at room temperature before serving. Avoid refrigeration,which can dry brownies out and make them less chewy.
Q8: Any pro tips for making brownies even better the next day?
A8: Letting brownies rest overnight actually enhances their flavor and chewiness as the ingredients meld.Reheat slightly in the microwave for a few seconds just before eating to revive that soft, gooey sensation-pure comfort in every bite!
With these insights, your path to baking perfectly classic chewy brownies is clear-prepare to wow taste buds with every fudgy, chewy square!
In Retrospect
There you have it-the ultimate blueprint for crafting perfectly classic chewy brownies that strike the ideal balance between fudgy indulgence and tender bite. With these tips and tricks tucked under your apron, every batch you bake will emerge from the oven boasting that irresistible texture and rich, chocolatey depth that brownie lovers dream of. So go ahead, preheat that oven, gather your ingredients, and let your kitchen fill with the warm, mouthwatering aroma of homemade perfection. Because when it comes to chewy brownies, the classics don’t just satisfy-they create moments worth savoring bite after blissful bite. Happy baking!
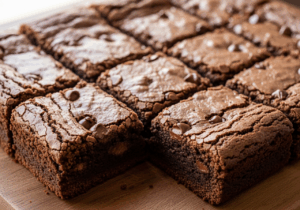
Funfetti cake mix is a beloved baking staple that instantly brings joy and nostalgia to any celebration. This colorful, confetti-speckled treat traces its roots to the iconic American birthday party experience and has evolved into a versatile canvas for culinary creativity. Unlocking the sweet science behind funfetti cake mix reveals how simple ingredients combine to create a moist crumb and vibrant bursts of color, setting the stage for countless inventive twists and decadent frosting pairings. Whether you’re a seasoned baker or a curious beginner, mastering these elements will elevate your funfetti baking game to new heights.
Prep and Cook Time
- Readiness: 15 minutes
- Baking: 25-30 minutes
- Cooling: 30 minutes
Yield
8 generous servings (one 9-inch round cake or equivalent cupcakes)
Difficulty Level
Easy to Medium – Perfect for bakers seeking approachable fun with room to customize
Ingredients
- 1 box funfetti cake mix (15.25 oz, preferably refrigerated for fresher mix)
- 3 large eggs, at room temperature
- 1 cup whole milk, warmed slightly
- ½ cup vegetable oil or melted unsalted butter for richer flavor
- 1 teaspoon pure vanilla extract
- Additional rainbow sprinkles (gel-based preferred for less color bleed)
Instructions
- Preheat your oven to 350°F (175°C). Grease and flour a 9-inch round cake pan or line a cupcake tin with liners.
- Combine the funfetti cake mix, eggs, warmed milk, oil, and vanilla extract in a large mixing bowl. Use a hand mixer on low speed to blend until smooth and uniform, about 1-2 minutes. Avoid overmixing to keep the texture tender.
- Gently fold in ¼ cup extra sprinkles with a spatula. This ensures even distribution and prevents color bleeding during baking.
- Pour the batter evenly into the prepared pan(s), smoothing the tops with a spatula for uniform rise.
- Bake for 25-30 minutes (20-22 minutes for cupcakes), or until a toothpick inserted into the center comes out clean with a few moist crumbs.
- Let the cake cool in the pan for 10 minutes, then carefully invert onto a wire rack to cool fully before frosting.
- Optional creative twist: For a surprising layer of flavor, fold in finely chopped white chocolate or citrus zest at step 3 for added decadence and aromatic lift.
Tips for Success
- opt for whole milk and room temperature eggs to improve batter emulsification, resulting in a moist, tender crumb that stands out from typical funfetti cakes.
- Choose gel-based sprinkles as they hold their color better and prevent bleeding into the batter, preserving those vibrant confetti pops.
- If you prefer a fluffier finish, replace half the oil with melted butter for a richer mouthfeel and subtle depth.
- To prevent cakey dryness, avoid overbaking: start testing your cake 5 minutes before the minimum bake time.
- Make it ahead: layer and frost the cake, then refrigerate for up to 2 days. Bring to room temperature before serving for the best flavor and texture.
Decadent Frosting Pairings to Complement Every Bite
Classic buttercream is the quintessential companion, but feel free to get creative:
- Whipped cream cheese frosting: tangy and smooth, it balances the sweet confetti notes beautifully.
- Salted caramel buttercream: adds a luxurious depth with a hint of saltiness that cuts through the sweetness.
- Fluffy whipped vanilla bean frosting with flecks of real vanilla bean intensifies aroma and visual appeal.
- Lemon mascarpone frosting: bright and silky for a refreshing, modern twist.
Serving suggestions
Serve your funfetti cake slices on pastel-colored plates to amplify the festive vibe. Garnish each slice with a sprinkle of edible glitter or a small cluster of fresh berries for bursts of natural color.Complement your dessert with a chilled glass of sparkling lemonade or a frothy cappuccino to round out the celebratory experience.

| Nutrition | Amount per Serving |
|---|---|
| calories | 320 kcal |
| Protein | 4 g |
| Carbohydrates | 44 g |
| Fat | 12 g |
For deeper insight into frosting techniques, check out our thorough Frosting Basics Guide. To understand the chemistry behind baking powders and leaveners used in funfetti mixes, the King Arthur Baking Science Guide is an excellent resource.
Q&A
Q&A: The Ultimate Guide to Funfetti Cake Mix Magic
Q1: what exactly is Funfetti cake mix magic?
A1: Funfetti cake mix magic is the delightful art of transforming a simple boxed Funfetti cake mix into an remarkable, personalized dessert marvel. It’s about elevating the colorful sprinkle-studded batter into something uniquely yours-whether that means richer flavors, whimsical decorations, or unexpected mix-in surprises. Think of it as a sprinkle-infused adventure that turns convenience into creativity!
Q2: Why choose Funfetti cake mix as a baking base?
A2: Funfetti cake mix is like a party in a box. It combines the classic vanilla cake flavor with playful rainbow sprinkles baked right in,offering a cheery canvas that’s perfect for customization. Its moist texture and sweet crumb pair well with countless flavor boosters and frostings-making it a baker’s best friend for easy yet notable treats.
Q3: Can I make Funfetti cake mix healthier without losing the magic?
A3: Absolutely! You can swap the water or oil for greek yogurt or applesauce to boost moisture and protein. Using less sugar or adding mashed bananas or pumpkin puree can add natural sweetness and nutrition. And if you want to keep the sprinkles but nix artificial dyes, look for natural sprinkle alternatives-fun and guilt-free!
Q4: What are some fun mix-in ideas to jazz up Funfetti cake mix?
A4: The sky’s the limit! Try folding in mini chocolate chips, crushed candy, or chopped nuts for extra texture. Fresh berries add bursts of tangy sweetness, while a swirl of peanut butter or Nutella can surprise your taste buds. For a grown-up twist, a splash of flavored liqueur or espresso powder can turn it into a decadent delight.
Q5: how can I use Funfetti cake mix magic to impress at a party?
A5: Presentation is key! Bake cupcakes with edible glitter,create layered rainbow cakes,or pipe colorful buttercream adorned with sprinkles. Even better-turn your Funfetti cake into cake pops, cake truffles, or fun parfaits. The inherent cheerfulness of Funfetti automatically brings smiles; your creative flair will earn bragging rights.
Q6: Are there any secret tips for baking the perfect Funfetti cake from mix?
A6: For a moist, fluffy cake, consider replacing some of the water with milk or buttermilk. Use room-temperature eggs and freshly melted butter instead of oil for richer flavor. mixing the batter gently keeps the sprinkles evenly distributed without bleeding their colors. And don’t forget to grease your pans well to preserve that perfect crumb!
Q7: Can Funfetti cake mix magic extend beyond traditional cakes?
A7: Definitely! use the mix as a base for waffle batter, pancakes, or even fun cookies. Blend it into a milkshake or layer it into an ice cream cake. With a little inventiveness, Funfetti’s joyous spirit can make just about any dessert sparkle with colorful magic.
Q8: What frosting pairs best with a Funfetti cake?
A8: Classic vanilla buttercream is a fabulous choice to keep the sweet simplicity alive. Cream cheese frosting adds a tangy counterpart that complements the sugar rush. For something whimsical, try cotton candy or marshmallow frosting-and don’t forget to sprinkle some leftover funfetti on top for the full magical effect!
Q9: how long can I store a homemade Funfetti cake?
A9: Covered tightly in an airtight container, your Funfetti cake stays fresh for about 3-4 days at room temperature. For longer life, refrigerate it for up to a week or freeze it for up to 3 months (wrapped well).When thawed, a quick warm-up in the microwave brings back that just-baked charm!
With this Q&A, you’re now ready to unlock the full potential of Funfetti cake mix magic-where convenience meets creativity in every bite!
In Retrospect
And there you have it-the ultimate guide to Funfetti cake mix magic! From simple tweaks to dazzling decorations, this colorful world of sprinkles and batter is your playground. Whether you’re a baking beginner or a sprinkle-savvy pro, these tips and tricks promise to turn every box of Funfetti cake mix into a celebration-worthy masterpiece.So go ahead, don your apron, let your creativity run wild, and transform an ordinary cake mix into a party in every bite. After all, with a little magic and a lot of fun, the sweetest moments are just a sprinkle away!